Showing posts with label Bread. Show all posts

31 January 2018

Culturing and Fermenting Food, the New Old Ways

Assorted ferments l-r - Fire cider, kale kraut, kraut, apple and red cabbage kraut,
green tomatoes, green and wax beans and curried sunchokes and kombucha in the back
For the most part I try to keep on topic here about all things Italian especially from our Piemontese perspective here in the Alps, but before I jump into writing some posts this year about what we get up to in our slice of the Italian Alps, I thought I would share with you my latest grand adventure in food exploration. I occasionally digress and his is going to be one of those digressions.
Our organic garden produce
As a passionate and avid cook I have been on a food journey most of my life of some sort or another. Every step and stage of my life I have read, cooked, baked, canned and explored cuisines, techniques and pursued my all round unquenchable curiosity about our daily ritual of gathering, preparing and ultimately the enjoyment of feeding and dining with others.
This current very popular food trend of lacto fermentation and culturing food and drinks in America has been a hot topic of conversation with friends and guests with various levels of interest. Some people are familiar and for others it is completely new to them. I imagine if you are reading this you most likely fall somewhere in between. Fermenting and culturing is quite a broad subject that includes, pickles, cheeses, wild yeasted bread, also known as sourdough, and dairy products like yogurt and milk kefir, not to forget to mention wine, beer, mead, and kombucha and so much more.
Another endless journey where it's all about the journey. 
My wild yeasted doughs in progress

My country loaf looking pretty inviting and makes me feel proud
I am not an expert at all, but I have done a fair amount of reading and experimenting with this revival of this ancient art of preserving of food, so I thought I would share some of my enthusiasm for culturing, fermenting and especially lacto ferementation and other fascinating food and drinks.
I will also share some of my sources of information and links to purchase some supplies and carry on your own research if you would like. You will find those links listed at the bottom of this post, so feel free to skip straight to them if you prefer.
Kombucha brewing
 I grew up learning to preserve foods through salt and vinegar methods of jarring up pickles and veggies along with piquant sauces to enliven many a Mexican inspired dish or two after I moved out west.  I really didn't know about fermenting foods with just salt and cool dark places. It seems that ancient tradition is long established in eastern Europe, Russia and Asia. I imagine if you came from immigrant families from those parts of the world these foods are more familiar to you.
Kimchi
If you are unfamiliar with the term, lacto fermentation, it is about preserving foods, naturally, mainly with salt, and "it doesn't necessarily have anything to do with dairy. Instead, the lacto refers to lactic acid. All fruits and vegetables have beneficial bacteria such as Lactobacillus on the surface. In an anaerobic (oxygen-free) environment, these bacteria convert sugars into lactic acid, which inhibits harmful bacteria and acts as a preservative. It's also what gives fermented foods their characteristic sour flavor."*  I am providing links to some resources that I have found helpful and just to be clear, I have no affiliation with any of them nor receive any compensation, I just hope they will be useful for you also, or, at least give you a point to start your research.   * quote from Emily Han September 2013 at "the Kitchen".
Making a variety of ferments and also  jasmin tea kombucha
We have found it beneficial to be able to preserve an abundance of garden vegetables into tasty foods that will sit on the shelf until we can manage to consume them when the abundance has slowed down. It has the added benefit of adding much needed good bacteria to our often over taxed digestive systems from a variety of healthful foods, drinks and snacks. I would caution that there seem to be a lot of health claims being made for these sources of probiotics and  for that I am always rather cautious with how much of it can be true. We do find that it has been helpful in aiding digestion and the kombucha and water kefir drinks give a refreshing lift. For me, if I feel indigestion coming on, a few tablespoons of sauerkraut or fermented root vegetable usually does the trick. I have also had success with my own apple cider vinegar and milk kefir too. For me they bring immediate relief and I find the milk kefir to be very comforting for the occasional bout of indigestion. Maybe its just me but you might at least give it a try. The various ferments add interest to salads, sandwiches, and side dishes, just like regular vinegar pickles do whilst adding more probiotic to your diet. Milk kefir has been a great way to make creamy salad dressings and dips as well as breakfast or afternoon pick me up smoothies. The journey to discover ways of enjoying all of these products is as interesting as making them.
Making apple cider vinegar
A few years back when I kept reading about lacto fermented foods everywhere I began my research in earnest, as it piqued my curiosity to learn more. Who knew what an all out frenzy of learning and experimenting that this way of preserving food was going to lead me down such a long and winding rabbit hole of discovery.
Giardiniera
It didn't take me long to drift over to a group on facebook called Wild Fermentation  where the fun really took off. The group takes their name from the book by the same name, Wild Fermentation, written by Sandor Katz. You don't get very far into your research about fermentation before Sandor Katz's name pops up frequently. He refers to himself as a "fermentation revivalist" and it seems he certainly has had a pied piper effect in his sharing of fermenting knowledge.  I promptly bought his book as an ebook and found it a great place to start and still reference it repeatedly.  The folks on the Wild Fermentation facebook group are over the top crazy about preserving food in a tasty way. This effort to preserve has been happening ever since there has been an abundance of food that needs to be kept for the time when there is a lack of food. What a fascinating group of crazy fermenters. I had tried making a few jars of sauerkraut, which I hadn't made in years, but after discovering this group, I now have a whole new viewpoint for adding in other veggies, herbs and spices to add interest to the flavor profile. Who knew sauerkraut could be so interesting.
Smokey Kale and Cabbage Kraut
The facebook group has files which are a great source of information and inspiration, as well as just scrolling through the groups feed and reading what others have asked and the groups answers. I have found the people there to be very helpful whenever I have asked any question. People are fermenting things I have never heard of and things I would have never dreamed of doing myself, like miso and tempeh, but now I think, perhaps one of these days, I just might give it a go. It's just all truly fascinating to me.

So here are some of my suggestions for discovering the wonderful world of fermentation:
  1. Read up on fermentation online, here  and here, and youtube videos
  2. Join a facebook group dedicated to fermenting, there are various ones. I like Wild Fermentation, there are others like WF Uncensored, etc...
  3. Buying a book, Wild Fermentation by Sandor Katz is a great place to start. This link is to his site, there are others, but I haven't gotten that far as there is just so much out there to try once you get the hang of percentages. 
  4. Sign up for Cultures for Health's newsletter and receive 8 free ebooks covering various types of fermenting and culturing that will answer a lot of questions and get you started with a source of recipes. You can unsubscribe at any time. They have a lot of sales and deals going all the time. The newsletters are very interesting  and the website is a wealth of recipes, videos and selling point for products. My caution, I cut back on the frequency of their mailings and I am not completely convinced about the dried cultures. My preference is for live grains and starters. They are very knowledgeable and helpful.
  5. Another great site is Yeemoos . I like their philosophy about "adoption" of their cultures and they have a smaller scale of information on their site. A bit more manageable.  If I were in the states, I would be adopting a ginger bug faster than I can type this. Love all ginger option
  6.  The folks over at, "The Probiotic Jar" have made a really handy brining chart that I have found invaluable for quick reference on amounts of liquid to salt percentage solutions. They have a great line of fermenting supplies and vast amounts of knowledge and experience.
  7. If you live on this side of the pond, I have found Happy Kombucha in the UK to be a great resource and where I sourced my Kombucha scoby and milk kefir grains a few years ago and they are still going strong. 
  8. Try your hand at sauerkraut, as it is simple and an easy way to success.
Assorted ferments
Additional Fermenting Tips that I have found helpful along the way:

  1. When making sauerkraut, use the direct salting and squeezing the cabbage to make its own brine. Don't use brine for kraut as it usually comes out too salty.
  2. Cut or slice your veggies into similar sizes and thicknesses so that they ferment at the same rate. 
  3. Start with just 1 or 2 herbs or spices when you begin to add new flavors so you see how well you enjoy those flavors without muddying the results with too many different flavors going on. There is plenty of time later on to work up the complexities once you have a good idea of herbs and spices that work for your taste buds. 
  4. I use a 2% salt brine or less for most brines. The more the salt the crisper the veggies, although the softer veggies have their place as well. Adding grape, oak, horseradish, or currant leaves to jars will help add tannins to keep the veggies crisp as well. I always add horseradish leaves to my dill pickles.
  5. Use the best water you can, chlorine will keep your veggies from fermenting and inhibit good bacterial growth.  
  6. The less salt you use, the faster the veggies will ferment. A cool dark place is ideal for fermenting and storage. WArm kitichen counters will speed things up so you need to keep a watchful eye.
  7. Any type of pepper or pepper combo needs a 5% salt solution to preserve peppers and be safe. 
  8. Start out tasting your ferments every day or so along the way to find what amount of sourness works for you.
  9. Don't give up too early as some times if you are not wild about the flavour, let it ferment longer and often it will vastly improve. I like my sauerkraut at least 2-4 weeks fermented. i had a beet and carrot combination that didn't excite my tastebuds till they had sat for 6 months. I had given up on it and was about to toss them. I was pleasantly surprised. 
  10. On the other had I have found that some ferments are better with a shorter ferment for my taste buds. For instance, when I have added apple to sauerkraut I like a much shorter ferment and try to at it faster than a regular sauerkraut that can sit  almost indefinitely as long as you keep it in a jar that doesn't have too much air space. So you may need to keep moving it into smaller jars if you are eating it fast enough. 
  11. Here is "The Probiotic Jar's" Brining Chart for quick reference. 
  12. You can order their Probiotic Jar refrigerator magnet of the chart from here

I hope you have found this of interest and you will feel inspired to add another element to your cooking and daily diet.
 ~~~ ciao for now and happy fermenting ~~~ 
Marla

17 March 2015

Bella Baita's 1st Handcrafted Artisan Bread Workshop

Udite! Udite!
Announcing Bella Baita's  
Handcrafted Artisan Bread Workshop

May 22-25, 2015  (2 Days / 3 Nights)

Learn to make gorgeous handcrafted breads in the beautiful Italian Alps using natural leavening and commercial yeast to produce incredible tasting bread with a longer shelf life.

Ralph's Trademark Lattice loaf

I am more than a little excited to invite you to join us to participate in our 1st Handcrafted Artisan Bread Workshop coming up this May 22-25.  
Fabrizio and myself, Marla will be hosting this 2 day workshop with our very special guest teacher, from Holland, the very talented and masterful baker Ralph Neiboer
Ralph Neiboer and some of his breads

I met Ralph online through an Artisan Bread Baking Group where he not only posted some of the most incredibly beautiful and tempting breads, but I noticed he seemed to be helping everyone with with his friendly and encouraging expertise. When I saw that he taught workshops it didn't take us long to contact him and decide to offer this bread making workshop.
 Ralph is a self taught baker whose passion for making bread that is well made using a variety of grains and methods for crafting bread that is incredibly flavorful, but are works of art in themselves. Ralph followed his passion in 2012 and began Bakkerij or Breadworks Workshops , as a way for him to teach his gospel of authentic bread made by your own two hands. He teaches in and around Schagen, Netherlands and also further from home around Europe. He also attends several master classes in bread making taught by masters like Josep Pascual and others whenever he can. You will not want to miss this opportunity to bake with Ralph and learn what this humble bread master has to share with us. 
Ralph at home baking pizza in a wood fired oven


Ralph's Pizza
Classes will take place in our kitchen and dinning room where we normally host our cooking classes at Bella Baita. Our kitchen is set up for hands on classes, mixing everything by hand to get the feel for the dough. Techniques are easily adapted to mixers that you might use at home. 

Our dining area also has tables to mix and roll out doughs with plenty of room to spread out. 
Marla and guests

We will be baking in a convection oven, gas, and wood fired, so we will really get to see the differences they all make. Participants will be limited to no more than 8 people, so there will plenty of opportunity to get personalized instruction and attention to your questions.

Bella Baita's breads and pizza in our wood fired oven
The workshop will cover a variety of methods of bread making, including natural leavening often called sourdough, but more accurately described as wild yeast as well as some breads made with commercial yeast. We will be using different types of leavening, some that are liquid and some that are firm. You will be instructed on how best to maintain them. Best of all you are welcome to take some of the natural leavens home with you when you go. 

During the workshop you will be introduced to:

  • The making of a wild yeast starter along with the care and feeding of it
  • High hydration bread doughs and how to handle them
  • Whole grain and heritage flour varieties, like durum, spelt, rye, einkorn
  • Shaping of loaves making a variety of shapes
  • Long cold proofing of loaves for maximum flavor
  • Decorative techniques and styling
  • Some of the possibilities that will be covered will be no knead bread, ciabatta, country batards, boules, rolls, lattice covered loaves, pizza and focaccia

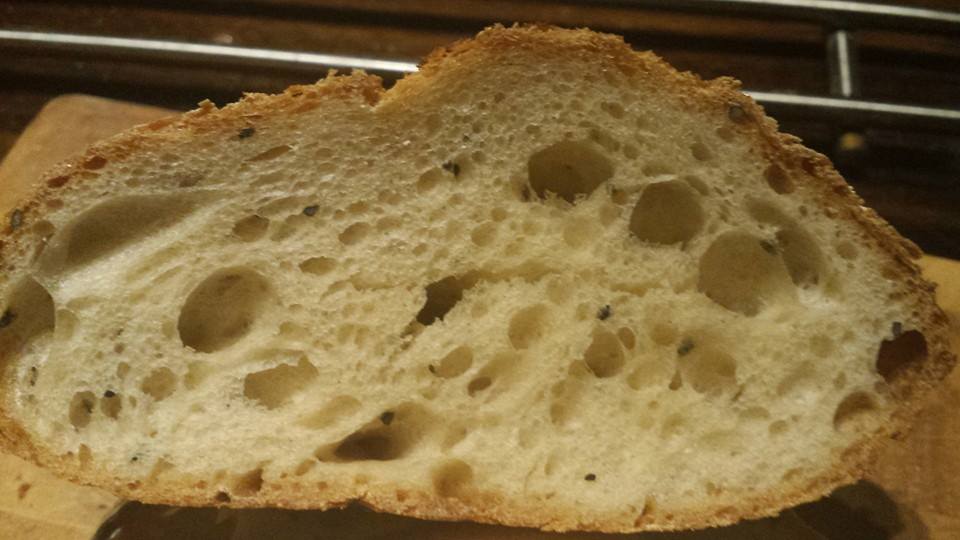
Ralph's open holed structured bread
Marla's Einkorn loaves with sourdough scones made with stone ground wheat flour
Bella Baita with Monviso in the background

For those of you not familiar with Bella Baita, we are a small B&B Inn located 50km southwest from Turin's Caselle airport, in the foothills of the Italian Piemontese Alps, 12km west from Pinerolo. We are situated at 1,10 m (3,600 ft) in the chestnut and pine forest about 6 km up from the small village of Pinasca. 
As we are somewhat remote from town, we are making the work shop over a long weekend, arriving Friday in time for dinner where we can all relax and introduce ourselves. I will be demonstrating a focaccia dolce that we will have for breakfast on Saturday morning. 
Marla and Fabrizio
Fabrizio and I will be on hand to facilitate the workshop and make your stay with us a welcome one. We are both former chefs that have been running our B&B Inn for about 11 years. We teach northern Italian cooking and are passionate about our mountains, food, and promoting this area for its beauty and off the beaten path charm. We have an organic garden, actively shop our farmers markets, promote local food producers, artisans, and do our part to support all local businesses. We hope you will join Ralph and us as we share our passion for healthy genuine bread. 

Our dining and part of our work space 
The price for the workshop is €250 per person and includes:
  • Three nights lodging
  • All lovingly prepared home made meals with local wine or soft drink
  • All materials and course fee for the workshop
**Inquire about pricing that includes includes all meals for non participating workshop guests sharing a room with a workshop participant. 

Please do not hesitate to call or write us now as places are limited and times is drawing near.  

Write us at  Info@bellabaita.com  
Mobile Tel: Marla (0039) 339 750 3940 
Mobile Tel: Fabrizio (0039) 347 984 2945

Visit our website to learn more about the area and our inn 

See you soon!!!!!!

16 October 2013

Normandy Apple Bread for World Bread Day 2013


It seems that every day at our house is World Bread Day, mainly because I am so fond of baking our own daily bread because it really is that much better. I  have a very appreciative and voracious bread monster that I am married to and we live up aways from town, so it just makes more sense to not have to run into town for what is one of our most essential foods. We love to offer what we think is a superior loaf for our bed and breakfast guests as well. Annually, on October 16, there has been an official designation for celebrating our beloved partaking of  the "staff of life" that we call bread. Eight years ago a tradition of celebrating this annual event was initiated by food blogger  Zorra of the "1x umrühren bitte aka kochtopf' blog. I have participated before, but not annually. When I looked to see what I had submitted before, I laughed to see that it was an apple bread as well.  That delicious loaf had chestnuts in it. I love that loaf, but was looking to improve on the apple themed  bread as apple season is well under way and we had many wind fall apples that were begging to be used up and I wanted a more pronounced apple presence.  I went to one of most favorite bread books, simply named Bread by Jeffery Hamelman and found his reicipe to be exactly what I was looking for. His version called for dried apples and apple cider. I had some dried apple slices from last years batch and some local apple juice. I have to say that in the US apple cider where I grew up meant fresh unprocessed apple juice made form a mixture of apple varieties for a delicious beverage. It never was alcoholic unless you left it too long before drinking it. The rest of the world enjoys a bit of a kick to their cider. I didn't have any cider with a kick, but the apple juice pumped up the apple flavor and I imagine if it had been alcoholic it would have made the bread just a little bit lighter. No matter what you use, the loaves are exceptional. They are great toasted and wonderful slathered with jam or honey butter, or savory additions like goats cheese, ham and turkey. It was tempting to eat the whole loaf straight out of the oven, but we refrained. I did make it second batch shortly after the first when we fired up the wood oven and turned out an even more outstanding loaf. I dried more apples for the second batch and found that the apples cubed gave more of a flavor burst than the slices, which tended to melt into the loaf.  A combination of the two turned out just fine. Do try this recipe and if you are serious about bread baking do consider buying this book. The recipes are aimed at the serious production bakers but he does have them scaled down for 2 loaves for home baking. Sadly though he didn't give the weights in grams, which for me is a much easier way to go, but fortunately I have a scale that weighs in both versions. Do have a go with making some bread at home. You will find it so satisfying on so many levels.
 Happy World  Bread Day 2013!
Apple bread inside

Normandy Apple Bread
Adapted from Bread:A Baker’s Book of Techniques and Recipes 
by Jeffrey Hamelman 

Makes: 2 large loaves


Directions: page1image18792

The day before you plan to make this bread, make sure your starter has been fed.


Drying the Apples:
A couple of days before you plan to make the bread, dry the apples in the oven. Or, if you have dried apples, you can use them. I used some dried slices and also baked some cubed apples  baked at 250 F /120 C. or in a dehydrator until they feet leathery. Drying the apples intensifies the flavor and prevents them from releasing excess moisture into the dough.

Day One:
Stiff Levain
Build:
5.8 oz  Bread flour (1 3/8 c)3.5 oz  

Water- room temp  ( 3.5.oz)
1.2 oz  Mature starter  (2T+1 tsp)

Approximately 12 -14 hours (more if cool in the kitchen) before you start the dough, mix up this stiff levain. Mix all together and cover. 

Leave to rise over night. 

Day Two:


Final Dough Ingredients:

1 lb 7 oz cups Bread flour- ( 5 1/4 c)
3.2 oz rye four - (1 cup)
7.4 oz Water -
(3/4 cup)

10.9 oz Apple cider- (1 1/3 cup) 
.6 oz Salt- 1 T
 
.2 oz Instant yeast- (1 tsp)

9.3 oz (all) Stiff Levain- (from the night before) 
4.8 oz Dried apples- (1 1/2 cup)

Mix everything together, except the apples, in your stand mixer with the dough hook. 3 minutes on low to combine, then 3 minutes on medium.
Turn out onto a table and add the apples. 

Knead until they are evenly distributed.
Cover dough and let rise 2 hours.
Stretch and fold in thirds over each other like a letter after one hour.
When your 2 hours have passed and your dough has risen well, divide the dough into 2 pieces and shape into loaves. Place loaves in proofing baskets or bannetons and cover. 

Let rise, covered, 1½ hours or until well risen.
Meanwhile, preheat oven, with a baking stone, to 450°F.
Mist and slash loaves.

Bake for 15 minutes at that temperature, 
Turn down to 420°F and bake for about another 25 minutes. 
Total baking time of about 40 minutes. 
Let cool on racks. 


One of two normandy apple loaves

29 March 2013

Pane alla Zucca or Pumpkin Bread for Easter 2013

Officially, according to the calendar, spring is here, but it seems that winter has made a comeback with plans to stick around.  Easter is early this year and it seems that the real color, aside from a few primula and purple phlox,  comes from Easter decorations.  Store window dressings are colorfully extravagant, while colorfully wrapped Easter eggs festoon the grocery stores and market. I guess that will just have to do till spring blooming gets fully underway. 

 Colorful Italian chocolate Easter eggs on display at the Pinerolo market

This year in addition to that bread and other I am going to make Pumpkin bread or Pane alla zucca. It is  not a sweet quick bread like most of us from the US think of, but a yeasted bread that replaces the water in the recipe with pumpkin puree.  It's a colorful and flavorful bread that will help me use up the last pumpkin of last season that is need off being used before nature has it's way with it.  When I saw this being made on our local cooking show they hollowed out the center and filled it with some cooked broccoli and pancetta. If made into small loaves, it could be a soup or dip holder, but that is not what I am going to do. I'm looking forward to thick slabs of colorful bread. This year I decided to make and bake a full load of various breads the night before Easter in our wood fired oven. Not only will we have plenty of bread for the Easter feast, I 'll have some loaves to send home with our cousins.  I'll make some normal daily sourdough bread and add in some specialty breads for Easter. I am going to do a Casatiello Napoletano, because not only is it delicious it looks great with the whole eggs in their shell baked on top. You can find my recipe to it here.
My home made Casatiello Napoletano

This bread is best made with dense fleshed pumpkins or squash.  I made this loaf in the photo with butternut squash. So not really a pumpkin bread the winter squash varieties are so mixed up and interchangeable, suffice it say that a dense orange fleshed squash or pumpkin is what you are looking for. I will be using what is called here a Mantua squash, but as best as I can place it, it is some variety of kabocha squash, probably of the delica variety.  It is a smaller but dense squash that keeps well all winter, but now, it's time to use it and I think it will be a welcome addition to the bread basket.  

Pane alla Zuccca

It's pretty easy to make if you know what you are looking for in the way of rising. If you use the commercial yeast, it should be a one day bread if you start in the morning. If using sour dough it may take longer. I don't mind the longer rises, as I think it develops the flavor of the bread, so take you pick, but do try making this bread. It has a delicate flavor and beautiful color that is sure to please. 
Butternut squash chunks being steamed

Pane alla Zucca 

 My adapted recipe of Gabriele Bonci recipe

Ingredients:  

  • 10c /2.2 # / 1 kg flour I used a high gluten flour that is called manitoba here in Italy
  • 3/4c / 7 oz / 200g sour dough or livieto madre -- I refreshed mine the night before so that it was quite active  
  • or for secure results use some commercial yeast
  • 7 g yeast, dry instant
  • 3 3/4c / 1 1/2 # / 700g pumpkin/ winter squash pulp, cleaned*
  • 2 tsp Salt (q.b.)
  • Poppy seeds, optional for topping

Method:

  • If you are using a dense squash and are going to steam it, then peel and deseed your pumpkin or squash. Weigh it to make sure you still have enough . Cut the squash into chunks and steam it till soft.  Run the pulp through a food mill, ricer, or food processor.
  • If you are baking your squash, weigh your pumpkin to know what amount you have and cut the squash into slabs with the peel still on. Bake in the oven till soft. Scrape flesh off the peel and run the pulp through a food mill, ricer, or food processor.
  • Add the salt to the pumpkin either when cooking or when turning it in to a puree.
  • Measure or weigh out your flour into a large bowl.
  • Add the cooked prepared pumpkin pulp to the flour.
  • Add the dry yeast or sour dough
  • Mix together first with a spoon or spatula till a rough dough forms. You can continue to mix it in the bowl with your hands in till smooth adjusting the flour or liquid if needed. I like to finish mixing and kneading on the generously floured table. Mix and gingerly knead till the dough is smooth and pliable.
  • Lightly oil your bowl add the dough turning to oil the entire dough, cover with plastic wrap ,and set in a warm place to rise for about 5-6 hours.
  • Once the dough has risen well and is full of air and feels well risen, turn out of the bowl onto the table. Cut into two pieces. Lightly form the bread into to loaf rounds, tucking your ends underneath, being careful not to deflate the bread too much.
  • Dip the smooth top of each loaf into a bowl of water and then lightly press the wet dough into a bowl of poppy seeds.
  • Place the seeded side up on a baking tray. I usually use a silicon pad or baking paper to keep the bread from sticking to the tray. Let the loaves rise a little longer if you think they need it. Otherwise, with a pair of kitchen scissor, cut four gashes in the top in a circle to form a top knot. And if you like make 4 cuts with the scissors around the outside and through the sides top to bottom to make large petals.
  • Bake in a very hot oven. I usually start my oven at the highest temperature. Once it comes up to temperature. I spray the oven with water to form some steam and then quickly put the loaves in. I turn the heat down to 375*F (190*C) and bake the loaves for about 30-40 minutes. I have a convection oven and it does;t always take that long. Sometimes it is only 25 minutes. When the bread looks a golden brown and has a hollow sound when thumped, the bread should be done.
  • Let cool a while before slicing so the texture is not crushed. Breath deep and enjoy the bready wonderfulness before devouring.
* Cooks Notes
  • This recipe is originally in metric measures, so when adapting to cups it sometimes takes a little adjusting to get the right amount for your ingredients.
  • If I am using dense fleshed winter squash or pumpkins I will cut up it up into chunks and  steam them till soft and then puree them by using a ricer or food mill. 
  • If I have some of the larger varieties of pumpkins or squash that are sometimes stringy and very watery, I might consider baking them in the oven to reduce the liquid and intensify the flavor. Either way if you find your dough too stiff you can always add a bit of water or if the dough is too wet, then add a tad more flour. Bread is like that, so don't be afraid. Knead on.
Pumpkin or Squash Bread

06 April 2012

Promise of Spring and a Casatiello Napoletano Bread

Traditional Italian chocolate Easter egg given to us by our butcher
It's springtime and Easter is just around the corner this Sunday, April 8th. What better way to add some zippety-do-dah to your Easter table than with a dramatic Italian Easter bread, Casatiello Napoletana. Easter  seems to focus on eggs and chocolate so it seems that my last years offering of a chocolate cake and this savory Casatiello added enough of both that I have been asked by the family to make them again this year. I'll see what I can do. 

Chocolate always tries to steal the show
Casatiello is a traditional celebratory special bread of Naples. This  light savory brioche type bread is laced with abundant salami and cheese to make it irresistible and then dolled up with whole eggs on top held in place with crosses of dough to make it a conversation piece for sure. It is often made quite simply with the salami and cheese being adding to the dough and may be varied with all sorts of various cheeses and meats. This Napolitano Easter bread is rich with religious symbolism from the various ingredients to the presentation. Every bite tells of the celebration of the rebirth of Christ and earth. The use of milk, eggs and sheep cheese recalls the birth of Christ in the manger amongst the farm animals. The ring itself  representing Christ's crown of thorns embedded with eggs like jewels held in place with crosses like the one he was put upon and yet there is rebirth with this bread. Rich indeed. 
My photo of a photo in Sapori di Pasqua magazine
I want to make this again this year to work on my presentation as my dough was not entirely cooperative. The dough seemed to want to engulf the eggs and keep them out of sight. Tasted great and we make quick work of it even if the eggs weren't as distinctive as I would have liked. It was enjoyed by all anyway. I saw an interesting variation of it yesterday by a popular Sicilian chef who chopped the cooked eggs up and put all of the salami, cheese and egg on the rectangle of dough before rolling it up and baking it off in a tube pan, making it more of a appertivo treat. I will be trying that as well.  I hope you will enjoy making this bread and sharing it for years to come as I think you will find it a worthy treat for all of your senses.  
Buona Pasqua!
My own Casatiello Napoletana

Casatiello Napoletano per Pasqua

Recipe based on Peter Reinhart's version with some traditional twists

1 large round or 2 smaller loaves

Ingredients:

Preferment:

  • 1T/.33 oz (18-20 g) yeast, dry instant traditionally in Italy they will use 25g fresh yeast
  • 1T /.33oz (15 g) sugar
  • 1/2c/2.25 oz (70 g)  flour, here a "00" is used you can use a bread flour and all purpose flour combination to get a somewhat similar result or all of one or the other
  • 1 c/ 8 oz (236 g)  milk, luke warm 

Main addition

  • 3 1/2 c (16oz)  (450 g)"00" flour, same as above, bread or combo with all purpose
  • 1 t (5 g) salt
  • 1/4c / 2 oz (50 g) pecorino finely grated or parmigiano if you can't find pecorino
  • 1/2 c/ 3.5 oz (100g)butter, room temperature, although lard is the traditional fat used here

Additions 

  • 3/4c /6 oz (170-200) provolone, cubed or caciocavallo or other firm but easy melting cheese with some flavor, even swiss would be tasty
  • 4 oz  (100g) Italian style salami, here usually thin sliced, cut into strips or diced, your preference

Topping

  • 5 eggs raw in their shell, washed and dried
  • egg wash

Method:

Mix the flour, instant yeast, sugar and milk together in a medium bowl. Mix till smooth, cover and let rise for an hour.
Mix the other flour together in a large bowl or on the table of you prefer, with the salt, the pecorino cheese and add the fat into the middle of the flour working it into the flour till it is crumbly. 
Add the risen preferment to the middle of the flour mixture and work it all together to get a workable dough adjusting flour or liquid if needed. If mixing by hand be generous with keeping your hands and fingers floured. Work the dough till it is soft and pliable. 
Cover with a plastic cover in a bowl and let it rise for about an hour and half or till it has risen till almost double. 
Sprinkle some flour on the table, and turn the dough onto the table.
Gently work your dough our into a rectangular shape with your finger tips, gingerly pulling the dough trying to not lose all the air bubbles and lightness. 
Cut a few lengths of dough from one end to make crosses for securing your eggs on top later. 
Cut your strips into 10 even lengths.
Sprinkle all the salami and cheese over the rectangle and roll up the dough into a roll.
Grease a tube style pan with removable bottom for ease of removing after baking. 
Place the dough roll into the tube pan with the seam side down. Press down gently and make 5 indentations, even distance around the ring.
Place one egg into each indentation, pointy tip up. 
Place two strips of dough in a cross over the egg, pressing the dough cross ends into the dough ring.
Cover and let rise for an hour and maybe a half more or until the dough has risen till light.
Brush egg wash all over the top of the dough ring and crosses.
Bake in a preheated 330*F/ 170*C oven for about an hour till evenly brown and cooked through.
Remove the bread to a cooling rack and allow to cool for 5 minutes before removing the sides of the pan.
Wait another half an hour before removing the bottom pand and allow to full cool om the rack. 
Cut after a full hour of cooling. The eggs will be full cooked as well. 
Enjoy with friends and family.

14 April 2011

Focaccia Ripiena and Shaved Fennel Lemon Salad


Bread in all it's many forms is one of my enduring passions.  I am so completely fascinated by the fact there are so few ingredients and yet endless possibilities. I generally keep  a back up of bread dough in the fridge for unexpected times when the need arises to have fresh bread on the table. As a general rule, the longer a dough ferments, the tastier the bread is as it has time for al the natural sugars and proteins to break down and develop flavor. That is not to say that bread doughs will last indefinitely, but most people don't realize that you can hold a variety of bread doughs in the fridge and bring it out and bake fresh bread a lot m ore easily and frequently than you would think.  It can be challenging at times with refrigerator space and varying room temperatures, but eating the results are so worth it. If you are new to making bread or the concept of holding dough in the refrigerator to use as needed, I would recommend the very delicious book, "Artisan Bread in Five minutes a Day", by Jeffery Hertzberg and Zoe Francois. The premise being that you mix up a batch of dough, usually two loaves, and bake them off on the day you want to eat them after arriving home from work and have them ready to consume in time for dinner. The recipes work beautifully and there are enough basic dough formulas that can be easily varied, that it really is a good starting point for busy people that appreciate fresh quality bread. Your bread is a good as the ingredients that you use. I have made quite a few recipes out the book and find them accurate and  delicious. They scale up well if you are cooking for a crowd and have the refrigerator space to hold the dough.  I do however have two personal cautions as a general rule for all the recipes. The salt content is way beyond my taste and I systematically cut the amount by about half and the amount of yeast for me is excessive as well. You are able to bring the dough from the refrigerator to the oven in about 20 minutes, so they have boosted the amount of yeast that, for me, it has a too yeasty of a flavor to it. I consistently either cut way back on the amount of yeast, use a combination of my natural sourdough starter and commercial yeast or leave it out completely and  use my sour dough starter only. I am not usually in that big of a hurry that I need to use that amount of yeast and the result, with less yeast, is full flavor bread without  the delicate notes of the bread being overwhelmed by the yeast.  
I didn't start out to do a book review here, but I do think this is a solid starter bread book worth adding to your library and helping novice and more experienced bakers get into the routine of making your own daily loaf.  I see that they have a new book out called "Healthy Breads in Five Minutes a Day" with 100 new recipes, whole grain and  some non gluten ones as well. I imagine it is an excellent one as well.  I found their recipes to be tried, true and delicious, noting my aforementioned personal preferences in regards to adjusting the yeast and salt.  I vary most of these recipes with whole grains and variations as the spirit moves me. I would encourage you to do the same after making their basic formula a few times to get a feel for them.
I said all of that to get to my filled focaccia recipe.  I adapted the "Olive Oil Bread" recipe from "Artisan Bread in Five Minutes a Day? for this focaccia as a starting point. I had already made the dough a few days previous for rosemary focaccia for an impromptu dinner with friends and knew I need to get this dough out of the refrigerator and on to our table. I rummaged around and found that we had some Cima di Rapa, also known as broccoli rabe, and some fresh pecorina ricotta that was begging to be used. It didn't take long to have this greens and ricotta filled focaccia on the table rising and baked off in time for  lunch. I added an incredibly easy shaved fennel and lemon salad that I found over at Val's "More than Burnt Toast" blog and we were feasting like royals in nothing flat. Ok, maybe more like the royals contadini (farmers), but very happy contadini.

For the
Focaccia
This is the original amount for 4- 1 pound loaves. (4 - 500g loaves, more or less)
I used a little less than half of the dough for a 25cm/10" round, with a removable ring.
It will work  with just about any kind of pan.
Oil your pan generously. I use olive oil.
I have adjusted the salt and yeast. I used instant granulated Saf yeast

6 c flour, bread or all purpose variety
1/2 c whole wheat flour
1T yeast, dry instant, a light tablespoon, 1 package
2 tsp sugar
1T salt
1/4 c olive oil
 2 3/4 c tepid water

Mix the flours, yeast, sugar, salt together in a large bowl. Add the olive oil and water, mixing till a a rough dough is formed. Knead lightly till smooth and return to the bowl and cover with plastic wrap.
I mix by hand, but you could use a stand mixer with the dough hook or a food processor. Mix till it just comes together ad finish with a few light kneads till smooth.  Don't over mix or knead the dough too vigorously.  A light hand is good.  Let rise in a warmish spot for a couple of hours  or until the dough has risen to about double and begins to flatten or collapse on itself.
You can use the dough immediately or refrigerate in a lidded container. It is easier to handle when cold. I tend to use some immediately and then use the rest of the dough a few days later. I made this from the dough after several days in the refrigerator.
Use half of the dough, making sure that comes to room temperature. After the initial rise, I usually try not to handle it too much and don't knead it again. I cut the dough in half again with  one half being slightly larger than the other. The larger half I use for the bottom. I flour the table and gently coax the dough in to a circle to fit the bottom going up on the sides slightly. I flatten the top part the same using my fingertips to dimple the dough and stretching it to the right diameter to cover the bottom half.

For the filling

1/2 onion, sliced in to lengths
1-2 garlic cloves, minced
1# (400-500g) cima di rapa, washed and chopped into 1 inch lengths
You can use whatever greens or combination that you prefer. Broccoli rabe, is similar to mustard greens in that they have a bit of a bite, so consider using them or a mix of your favorite combo of greens.
Olive oil to saute the vegetables
200 g ricotta, a pecorino with a bit more flavor is good, you could use cottage cheese too
100 g parmesan or ricotta salata
These are the cheeses I had on hand. A combination of a soft mild cheese with a more potent salty style cheese is what you are looking for.
Salt and Pepper
pinch of peperoncino or hot pepper

Saute the onions in a small amount of oil till the soft. Add the garlic and  continue to cook adding your clean chopped greens. Add some water after the greens have wilted, cover and cook until the greens are soft but not all the way cooked. Season with salt and pepper.  let cool enough to handle.
Prepare your baking pan with oil and stretching your dough to cover and up the sides.
Spread your cooled greens around on the dough. Sprinkle with a pinch of hot pepper.
Distribute the ricotta cheese around the disk of greens and generously sprinkle your grated parmesan cheese over all.
Cover the top with the other piece of dough.
I let it rise about 1/2 hour, more if it seems like the dough hasn't really risen enough. You want the dough to be light, so let it rise as long as you think is necessary.
Drizzle some olive oil on top  of the dough.
Bake in the bottom shelf of a preheated 350*F/180- 190*C oven till the dough reaches a golden brown.
I have a convection oven so it only takes about 25-30 minutes.
In a conventional oven I think it will take 40- 50 minutes to get the bottom of the crust done.
Cool slightly, remove ring around the dough or flip out of your pan and serve warm.

I served it with this simple

Shaved Fennel Lemon salad

2 bulbs of fennel, the rounder bulb variety are less stringy and good for salads
1 lemon, organic is good as you will be eating the peel. Plump and firm, not one that is tired from languishing around waiting to be used.
4 tsp lemon juice, optional for me. I found it didn't really need it as my shaved lemon made it zippy enough, your call
Olive oil 
Salt 
Pepper if you like, I didn't bother

Use a mandoline or slicer on the thinnest setting that you can.
Shave the fennel and then the lemon into a bowl big enough to be able to toss the salad
Sprinkle a bit of good sea salt to season
Dress with enough olive to lightly coat the salad but not drown it.
Serve immediately.
You could shave the fennel and lemon and refrigerate until just before serving and then dress with oil and serve.
Bookmark and Share